Tag: Shopify Sidekick

  • Smart Discount Protector: Stop Your Profit Margins from Eroding

    Smart Discount Protector: Stop Your Profit Margins from Eroding

    PREREQUISITES:

    • Time: 60s
    • Access: Sidekick AI
    • Plan: Grow / Advanced / Plus

    The “Discount Stacking” Trap

    It starts with a simple “Welcome” code. Then you launch a “Buy One Get One” automatic discount for a holiday. Before you know it, a customer has used both, stacked a “Free Shipping” code on top, and you’ve just sold a product for less than it cost you to manufacture. Discount stacking is a silent margin killer. If you aren’t monitoring how your discounts collide, you aren’t just giving away profit—you’re paying customers to take your inventory.

    The Solution: Sidekick It

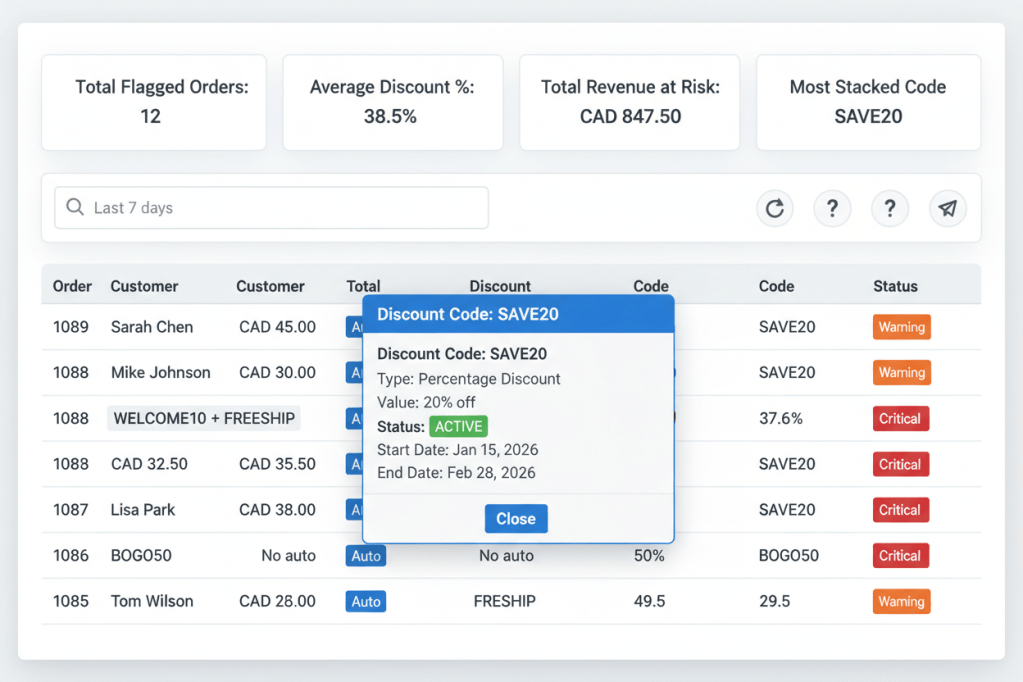
    To “Sidekick It” is to stop guessing and start auditing. Today, we’re building the Smart Discount Protector (aka the Discount Stacking Shield). This app provides a real-time command center that flags every order where total discounts exceed your safe thresholds. By identifying the “Most Stacked Codes” and calculating “Revenue at Risk,” you can fix your discount logic before the next big sale.

    PREREQUISITES

    • Shopify Plan: Must be on a plan with Sidekick access (Grow or higher).
    • Threshold Knowledge: Determine your “Warning” (e.g., 30%) and “Critical” (e.g., 40%) discount limits based on your COGS.
    • Sidekick Access: Ensure the Sidekick icon is active in your admin sidebar.

    The Exact Prompt

    Build a custom Shopify admin app called "Smart Discount Protector" (subtitle: "Discount Stacking Shield") that monitors and flags orders with excessive discount stacking.
    Main Dashboard: > - Show 4 analytics cards: Total flagged orders, Average discount %, Total revenue at risk, and Most stacked discount code.
    Display a table of flagged orders including: Order number (clickable link), Customer, Total, Discount Amount, Discount %, and Status badge (Warning/Critical).
    Include "Search" and "Time Filters" (24h, 7d, 30d).
    Logic & Storage: > - Calculate Discount % as: (total discount / (current total + total discount)) × 100.
    Flag orders above configurable thresholds (Default: 30% Warning / 40% Critical).
    Store thresholds in shop metafields (namespace: 'sidekick', key: 'discount_protector_settings').
    Automatically filter out refunded/cancelled orders to prevent false positives.
    Features: > - Clickable discount codes that open a modal with full details (type, value, start/end dates).
    Color-coded badges: Orange (Warning), Red (Critical), Blue (Automatic Discount indicator).
    Pagination and Refresh functionality.

    Highlight the text in the box above and copy it to your clipboard to start your build.

    How the Shield Protects You

    • Continuous Monitoring: The app scans your completed orders across the selected time period.
    • Stacking Detection: It doesn’t just look at one code; it sums up Manual Codes + Automatic Discounts to find the true discount percentage.
    • Visual Alerting: Orders are instantly color-coded. A “Red” status means the order likely hit your profit floor.
    • Actionable Data: By clicking on a flagged code, you can see if that specific promotion is the culprit, allowing you to disable or modify the rule in Shopify immediately.

    Technical Note: Post-Purchase Analysis
    This app is a monitoring tool, not a checkout blocker. Because Shopify’s checkout is highly secure, this app analyzes orders after they are placed. Use the data gathered here to adjust your “Discount Combination” settings in the Shopify Admin to prevent future stacking.

    Caution: Set Your Floor
    “Critical” thresholds should represent your “Breakeven” point. If your average margin is 45%, a 40% discount is critical because after credit card fees and shipping, you are likely losing money.

    Common Questions from the Lab

    Does this stop the customer from checking out?

    No. It identifies problematic orders once they are completed. If an order is truly disastrous, you can use the clickable order link to jump into the admin and cancel/refund it before fulfillment.

    Why does it ignore refunded orders?

    Refunded orders often show “100% discount” in data exports because the revenue is zeroed out. The app filters these out so your analytics remain accurate to actual sales.

    What is “Revenue at Risk”?

    This is the total dollar amount you have “lost” to discounts on flagged orders. It helps you quantify exactly how much stacking is costing your business each month.

    The Sidekick Challenge: Run this app for the “Last 30 Days.” What is your Most Stacked Code? If it’s a “Welcome” code stacking with your main sale, it might be time to update your discount combination settings!

  • Recipe: The “Image-First” Auto-Publisher

    Recipe: The “Image-First” Auto-Publisher

    Stop manual publishing. Automatically push products live the exact moment a photo is added.

    Author’s Note: I was scrolling through the Shopify subreddit recently and saw a merchant venting about a frustrating, yet incredibly common, problem. Their inventory app was syncing new products to their store perfectly, but the product images were coming in on a delay. The result? Half-empty “skeleton” listings were going live for customers to see. To prevent it, the merchant was stuck manually hitting “Publish” on hundreds of products every single day.

    It felt like the perfect challenge. Instead of writing custom code, I opened up Shopify Sidekick to see if we could architect a 24/7 background automation to fix it. Here is how we turned that Reddit pain point into a live solution in about 20 minutes.

    The Problem

    If you sync your inventory from an external ERP, drop-shipper, or CSV, those products often hit your Shopify admin as “skeletons”—just text and pricing, with no images. You definitely don’t want empty listings showing up on your storefront.

    The goal of this recipe is to build an automation that watches your store 24/7 and automatically “flips the switch” to publish a product only when it detects an image file has been attached.

    The Architect: Shopify Sidekick

    You don’t need to be a developer to build this, but you do need an architect. We are using Shopify Sidekick to fetch store-specific technical IDs, write our JSON payloads, and troubleshoot any errors we hit along the way.


    Phase 1: The Sidekick “Pre-Flight” Prompts

    Before we open Make.com, we need to gather your store’s unique technical data. Open Sidekick in your Shopify Admin and copy/paste these two prompts:

    Prompt 1: Get Your JSON Blueprint

    “I am building a Make.com automation to publish products to the Online Store. I need to send a PUT request to the Shopify Admin API. Please provide the exact JSON body required to set the published_scope to ‘web’ and the published_at to the current timestamp.”

    Prompt 2: Get your Publication ID (Just in case)

    “As a backup for my automation, please provide my Online Store Publication ID in the format gid://shopify/Publication/123456789.”

    (Save both of Sidekick’s answers in a notepad—you’ll need them in Phase 3!)


    Phase 2: Create the Shopify “Bridge” (Custom App)

    Standard third-party connections often lack the deep “write” permissions needed to change a product’s publication status. You must create a Custom App to give Make.com the right access

    • In your Shopify Admin, go to Settings > Apps and sales channels > Develop apps.
    • Click Create an App and name it “Sidekick Auto-Publish.”
    • Click Configure Admin API scopes. Search for and check these four boxes: read_products, write_products, read_publications, and write_publications.
    • Click Install App.
    • Click “Reveal token once.” ⚠️ STOP AND COPY THIS TOKEN NOW. Store it somewhere safe. Once you close this window, Shopify will never show it to you again.

    Phase 3: Building the Make.com Blueprint

    Log into Make.com (the free tier is perfect for this) and create a new Scenario.
    NOTE: If at any time you need clarification, just tell Sidekick where you are in the process, and where you are stuck.

    Important Make.com Quirk: You cannot create a logic filter between modules until both modules exist on the canvas. So, we will build the Trigger, then the Action, and then connect them with our Filter.

    Step 1: The Trigger (Watch for Updates)

    • Module: Shopify -> Watch Events.
    • Webhook: Click Add to create a new webhook named “Image Check.”
    • Connection: Choose Add, then select Custom Connection. Paste the API Token you saved from Phase 2.
    • Topic: Type and select products/update. (This tells Make to wake up every time a product is altered).

    Step 2: The Action (The Publisher)

    • Module: HTTP -> Make a request. (Place this right next to your Shopify module).
    • URL: https://your-store-name.myshopify.com/admin/api/2024-01/products/{{1.id}}.json (Note: Replace your-store-name with your actual store prefix. Replace {{1.id}} by clicking into the field and mapping the Product ID from your Shopify module).
    • Method: PUT
    • Headers: Click “Add item” twice to add two headers. Header 1 Name: X-Shopify-Access-Token | Value: (Paste your API Token from Phase 2). Header 2 Name: Content-Type | Value: application/json.
    • Body Type: Raw
    • Content Type: JSON (application/json)
    • Request Content: Paste the JSON code Sidekick gave you in Phase 1. It should look exactly like this:
    {
    "product": {
    "id": {{1.id}},
    "published_scope": "web",
    "published_at": "{{now}}"
    }
    }

    Step 3: The Logic Gate (The Filter)

    • Now that you have two modules connected, click the dotted line between them to “Set up a filter.”
    • Label: “Is Image Present & Is Hidden?”
    • Condition 1: Images[]: URL | Exists (This ensures an actual image file is attached).
    • Condition 2: Published At | Does not exist (Crucial: This prevents an “infinite loop” where the automation keeps trying to publish a product that is already live).

    Phase 4: Testing & Activation

    • Prep: Go to Shopify. Create a test product with no image and leave it as Draft/Unpublished.
    • Test: In Make.com, click the “Run Once” button at the bottom left. It will start spinning.
    • Trigger: Go back to your Shopify test product, upload an image, and hit Save.
    • Verify: Watch Make.com. You should see a green checkmark pass through the filter and hit the HTTP module. Go back to Shopify—your product should now be “Active” and published to your Online Store!
    • Go Live: Toggle the Make.com scenario to ON and let it run in the background.

    FAQ & Troubleshooting: Let Sidekick Fix It

    When building automations, errors aren’t a sign of failure—they are just part of the process. If your Make.com scenario throws a red error bubble, don’t panic. Copy the error, and let Shopify Sidekick act as your senior developer. Here are the most common issues and exactly how to use Sidekick to solve them:

    The HTTP module throws a “401 Unauthorized” error.

    The Problem: Shopify is blocking the request. This usually means your API token is incorrect, expired, or your Custom App is missing the right permissions.
    Ask Sidekick: “I am sending a PUT request to update a product in Make.com, but I am getting a 401 Unauthorized error. Can you list the exact Admin API scopes my Custom App needs to have enabled to allow write_publications and write_products?”

    The HTTP module throws a “422 Unprocessable Entity” error.

    The Problem: Your API token works, but Shopify doesn’t understand the data you are sending. This is almost always a typo or formatting error in your JSON body (like a missing comma or quotation mark).
    Ask Sidekick: “I am getting a 422 error in Make.com when trying to publish a product. Here is the JSON I am putting in the Request Content field: [Paste your exact JSON]. Can you rewrite this to fix any formatting errors?”

    Make.com says “Module references non-existing module ‘1’”

    The Problem: Make.com assigns numbers to modules based on the order you create them. If you deleted a module and added a new one, your Shopify trigger might be module 2 instead of module 1.
    The Fix: Delete {{1.id}} from your URL or JSON body, type {{, and select the correct numeric Product ID from the dropdown list.

    Products without images are still getting published!

    The Problem: Your Make.com filter is too broad. If you just check if “Image” exists, it might trigger on empty data brackets. You need to verify the image source URL actually exists.
    Ask Sidekick: “My Make.com webhook is triggering even when an image isn’t present. What exact field from the Shopify products/update webhook payload should I filter by to guarantee an image file is actually attached?”

    The REST API isn’t working for my specific store setup.d!

    The Problem: Sometimes, depending on your store’s complex sales channels, the standard HTTP REST method won’t push the product to the Online Store. You need to use Make.com’s “Make a GraphQL API call” module instead.
    Ask Sidekick: “The HTTP PUT method isn’t publishing my product to the Online Store correctly. I want to use Make.com’s ‘Make a GraphQL API call’ module instead. Can you write the exact GraphQL mutation and variables I need to publish a product, using my Online Store Publication ID?” (This is why we got that ID in Phase 1!).


    Time to Start Building!

    Building custom automations doesn’t have to be intimidating. With Sidekick acting as your co-pilot, you can easily bridge the gap between “I wish my store could do this” and actually making it happen. This image-first auto-publisher is just one example of how a few strategic prompts can save you hours of manual clicking every single week.

    So, what manual task are you going to hand over to the robots next? If you have a workflow headache you’re trying to solve, drop a comment below or reach out. Let’s see if we can build the next recipe together.

  • Stop Manual Tagging: Build a Bulk Manager in 120 Seconds

    Stop Manual Tagging: Build a Bulk Manager in 120 Seconds

    PREREQUISITES:

    • Time: 120s
    • Access: Shopify Sidekick / Admin API
    • Impact: Catalog Architecture

    The Tagging Trap.

    Standard Shopify bulk editing is a nightmare for precision work. You can’t see collection memberships and tags in one view, and tagging individual variants (like specific materials or seasonal colors) usually requires a monthly app subscription or hours of manual clicking. When your catalog hits “scale,” manual organization becomes a full-time job you didn’t sign up for.

    The Sidekick Solution: “The Central Command”

    This prompt acts as your Administrative Equalizer. It builds a comprehensive dashboard inside your Admin using Preact and Polaris. It provides a “God-mode” view of your store, allowing for variant-level tagging, manual collection mapping, and high-speed sorting—all within a native-feeling, paginated interface that handles large catalogs with ease.

    The Recipe

    "Create an app that lets me add tags to existing products in my store.
    It should show products in a table with their current tags and collections.
    Products should be expandable to show variants, but only if they have multiple variants or custom variant titles (not just 'Default Title').
    Allow me to add new tags to both products and variants using comma-separated input.
    Include a dropdown to add products to existing manual collections.
    Add sorting options: Title A-Z, Title Z-A, Newest first, Oldest first.
    When variants are expanded, they should align with the product table columns. Include Help and Share buttons that open modals with usage instructions and app information.
    The Share modal should include the exact prompt to recreate the app."

    Highlight the prompt above and copy it to your clipboard to start your Sidekick build.

    Product Tag Manager

    What This App Does

    • Smart Variant Management: Automatically hides the “Expand” option for single-variant products to keep your workspace clean.
    • Flexible Sorting: Instant toggle between Alphabetical (A-Z/Z-A) and Chronological (Newest/Oldest) views.
    • Granular Control: Apply comma-separated tags to specific variants or parent products simultaneously.
    • Pro-Level Pagination: Seamlessly navigate large catalogs (25 products per page) without losing your sort settings.

    “This prompt utilizes tagsAdd and collectionAddProductsV2 to modify live database entries. This app only works with manual collections, not smart collections.”
    Test the ‘Expandable Row’ feature on a single test product before bulk execution.

    Common Questions

    Do I need to create tags in the Shopify Admin first?

    No. Tags are created automatically as you type them into the bulk input field—no pre-setup required.

    Does this support Smart Collections?

    No, this tool is specifically designed for Manual Collections. Automated collections are handled by Shopify’s internal logic.

    Sidekick Challenge:How many hours a week do you spend on catalog organization? Tell me in the comments and I’ll help you refine this prompt for your specific workflow!!

  • Kill the Pricing Headache: Build a Bulk Variant Price Updater in 60 Seconds

    Kill the Pricing Headache: Build a Bulk Variant Price Updater in 60 Seconds

    PREREQUISITES:

    • Time: 60s
    • Access: Sidekick AI
    • Plan: Grow / Advanced / Plus

    The “Click-and-Wait” Fatigue

    Shopify’s native bulk editor is powerful, but it’s a chore when you need to change prices for a single product with 50+ variants. Whether you’re prepping for a flash sale or adjusting for inflation, you shouldn’t have to hunt through columns or wait for massive tables to load just to change a “Large / Red” variant from $20 to $25.

    The Solution: Sidekick It

    We are sharing a recipe for a Variant Price Updater. This app gives you a focused “Command Center.” You search for a product, see every variant on one screen, and update prices in bulk with a single click. No spreadsheets, no hunting for columns—just fast, secure pricing updates.

    The Exact Prompt

    Create a brand new Variant Price Updater app.
    The app should:
    - Provide BOTH a dropdown menu (loading up to 250 products alphabetically)
    AND a search field for product selection.
    - Display all variants for the selected product in a paginated table
    (100 variants per page).
    - Show columns for: Checkbox (for selection), Variant name (showing option
    values like "Small / Red"), Current Price, New Price input field.
    Logic:
    - Allow users to select multiple variants and enter new prices.
    - Include an "Update Prices" button that uses the productVariantsBulkUpdate
    mutation to update selected variants.
    - Show success/error messages and refresh the table after updates.
    - Include separate Help and Share buttons.
    Keep it simple and functional.

    Highlight the prompt above and copy it to your clipboard to start your Sidekick build.

    Key Features of Your New Price Updater

    Product Variant Pricing Manager
    • Dual Selection Mode: Use the search bar for speed or the dropdown to browse alphabetically.
    • Bulk Checkboxes: Only want to change the price of the “Extra Large” sizes? Check the boxes you need and leave the rest untouched.
    • Paginated for Performance: Even if you have hundreds of variants, the app handles them in 100-per-page chunks to keep things fast.
    • Real-Time Refresh: As soon as you hit “Update,” the app confirms the change and refreshes the table so you can see your live prices immediately.

    ⚠️ Warning: This app uses the productVariantsBulkUpdate mutation to push changes directly to your live store. Always double-check your “New Price” inputs before clicking Update—especially if you are adjusting high-ticket items!

    Common Questions

    Can I undo a bulk price change?

    There is no “Undo” button; you would simply run the prompt again with the previous prices. We recommend exporting a CSV of your products before any massive pricing overhauls.

    Does this update the “Compare-at Price”?

    This specific recipe focuses on the Current Price. If you want to handle sales, ask Sidekick: “Add a ‘Compare-at Price’ column to this table and include it in the update mutation.”

    Will new prices show up on my store immediately?

    Yes! Once the mutation is successful, Shopify’s cache usually updates within seconds for your customers.

    The Sidekick Challenge: What’s the biggest “pricing oops” you’ve ever had on your store? Let us know in the comments if this command center helps you sleep better at night!

  • Untangle Your Shipping: Build a Product Shipping Options Reviewer in Sidekick

    Untangle Your Shipping: Build a Product Shipping Options Reviewer in Sidekick

    PREREQUISITES:

    • 90s (Two-step prompt)
    • Access: Sidekick AI
    • Plan: Grow / Advanced / Plus

    The Shipping Profile Maze

    If you’ve ever spent hours wondering why a customer can’t see the “Expedited Shipping” option for a specific product, you know the headache. Shopify’s default interface makes it difficult to see which Delivery Profiles are assigned to which products at a glance. As you add special handling profiles (hazmat, oversized, dropshipped), it becomes a tangled mess of missing profiles and redundant rules.

    The Solution: Sidekick It

    This Sidekick-powered Product Shipping Options Manager cuts through the complexity. Instead of clicking through dozens of product pages, you can build a custom app that visualizes all your products and their assigned shipping profiles. This is your command center for pinpointing exactly why a shipping option isn’t showing up at checkout.

    The Exact Prompt

    Note: This recipe works best in two stages. Follow the order below:

    Step 1: The Foundation

    I want to create an app that checks various shipping options across all of my products
    and allows me to see very quickly what products have what shipping options available.

    Highlight the prompt above and copy it to your clipboard to start your Sidekick build.


    Step 2: The Refinement (Paste after Sidekick responds to Step 1)

    Request these enhancements:
    - View delivery profile details in a modal.
    - Add Help button and Share button.
    - Add expandable rows for variants.
    - Suppress expandable rows for products with only default variants.
    - Add shipping methods and conditions to the delivery profile details.

    Highlight the prompt above and copy it to your clipboard to refine your Sidekick build.

    Key Features of Your New Shipping Sidekick App

    Product Shipping Options Reviewer
    • Comprehensive Product View: See all physical products in one scrollable, paginated table.
    • Delivery Profile Assignments: Instantly identify which profile (e.g., “Heavy Goods,” “Dropship Partner”) each item belongs to.
    • Variant-Level Detail: Expand products to see if specific variants (like your “Oversized” version) have the correct shipping rules.
    • Detailed Profile Modal: Click any profile name to see Shipping Zones, Countries, and specific Methods (Standard, Express, etc.) along with their price/weight conditions.
    • Shareable Instructions: Use the built-in “Share” button to send the logic to your logistics team.

    ⚠️ Note: This specific app is designed for visualization and auditing. It pulls data from the Delivery Profile API. While it provides incredible clarity, always perform a final test at your storefront checkout after making significant changes to your Shipping and Delivery settings.

    Common Questions

    What is a “Delivery Profile”?

    It is a set of shipping rules for specific products and locations. Shopify uses these to determine which rates to show at checkout based on what’s in the cart.

    Can this app change the assignments?

    This specific recipe is a “Manager View” for auditing. To move products, you can follow up with Sidekick and ask: “Now, add a feature to move selected products to the [Profile Name] profile.”

    Is this useful for small stores?

    Even with a “General” profile, this app is a game-changer for troubleshooting why a specific country or weight bracket isn’t triggering the correct shipping rate.

    The Sidekick Challenge: Have you ever had a “Shipping Fail” where a customer was charged $0 for a heavy item? Drop a comment below and tell us how this audit tool changed your workflow!

  • Master Dimensional Weight: Build a Shopify Product Dimensions Manager in Seconds

    Master Dimensional Weight: Build a Shopify Product Dimensions Manager in Seconds

    PREREQUISITES:

    • Time: 60s
    • Access: Shopify Sidekick AI
    • Plan: Grow / Advanced / Plus

    The “Dim Weight” Trap

    Have you ever been shocked by a shipping invoice that was double what you quoted a customer? Welcome to the world of Dimensional Weight. Carriers like Canada Post, UPS, and FedEx don’t just care how much a box weighs; they care how much space it takes up. If you ship a 1lb pillow in a large box, you’ll be charged for the space, not the weight. If you aren’t tracking Length, Width, and Height, you’re flying blind.

    The Solution: Sidekick It

    Today, we’re using Shopify Sidekick to build a custom Product Dimensions Manager. This app creates a central dashboard to audit your entire catalog and save dimensions as Metafields—without needing a third-party paid app. By tracking these in Shopify, you can provide accurate data to 3PLs and use advanced apps to calculate exact box fits.

    The Exact Prompt

    Create a brand new Product Dimensions Manager app.
    The app should:
    - Display physical products that require shipping in a table.
    - Show columns for: Product name, Variant, SKU, Length, Width, Height,
    Dimension Unit selector (Inches, Centimeters, Meters, Feet),
    Last Updated, and an Update button.
    Include filter toggles:
    1. "Show only products with missing dimensions"
    2. "Hide out of stock products"
    Logic:
    - Allow users to enter L, W, and H values and select units.
    - Store dimensions as custom metafields using the productVariantsBulkUpdate mutation.
    - Show a "Last Updated" column for tracking modifications.
    - Include a Share button with instructions in an expandable section.
    Keep it simple and functional.

    Highlight the prompt above and copy it to your clipboard to start your Sidekick build.

    Product Dimensions Manager

    Key Features of Your New App

    • Metafield Integration: Automatically creates and updates Metafields in the sidekick namespace (length, width, height).
    • Smart Filtering: Instantly isolate products that are missing data or hide out-of-stock items.
    • Bulk-Ready Table: Update your L x W x H and Unit (Inches/CM) on one screen.
    • Data Validation: Prevents “fat-finger” typos by ensuring only numbers are entered for dimensions.

    ⚠️ Technical Note: The data saved by this app is stored as Variant Metafields (Key: sidekick.length, sidekick.width, etc.). Ensure your shipping or 3PL software is configured to read these specific metafield keys for automated calculations..”

    Common Questions

    Why store dimensions as Metafields?.

    Shopify’s core product fields don’t include L x W x H by default. Metafields are the standard way to store this extra data so other apps and carriers can access it

    Sidekick Challenge” question to encourage comments.

    Can I change the units later?

    Yes! The app includes a unit selector (Inches, CM, etc.). If you switch units, the app will update the sidekick.dimension_unit metafield accordingly.

    Is there a limit to how many products I can update?

    The productVariantsBulkUpdate mutation is very efficient, but if you have thousands of variants, Sidekick may process them in batches.

    The Sidekick Challenge: Check your last UPS or FedEx bill. How much did “Dimensional Weight” cost you this month? Let us know in the comments if this tool helped you bridge the gap!

  • Stop Guessing Shipping Costs: Build Your Own Product Weight Manager in 60 Seconds

    Stop Guessing Shipping Costs: Build Your Own Product Weight Manager in 60 Seconds

    PREREQUISITES:

    • Time: 60s
    • Shopify Sidekick | Plan: Grow/Advanced/Plus
    • Impact: High

    The “Zero Weight” Silent Killer.

    One of the quickest ways to lose money on Shopify isn’t high ad spend—it’s inaccurate shipping weights. Clicking into every single product variant in the Shopify Admin to check a weight field is soul-crushing work. This leads to inaccurate “Free Shipping” triggers and major discrepancies at the post office..

    The Solution: Sidekick It

    We are “Sidekicking” this task today. This isn’t just a list; it’s a command center. You’ll generate an app that lets you filter for those “0 weight” culprits and update them in a single table—no more opening 50 different tabs.

    The Exact Prompt

    Create a brand new Product Weight Manager app.
    The app should:
    - Display physical products that require shipping in a table.
    - Show columns for: Product name, Variant, SKU, Weight input field,
    Unit selector (Grams, Kilograms, Ounces, Pounds),
    Last Updated, and an Update button.
    Include two filter toggles:
    1. "Show only products with 0 weight"
    2. "Hide out of stock products"
    Logic:
    - Allow users to update weights using the inventoryItemUpdate mutation.
    - Query inventoryItem.updatedAt for the timestamp.
    - Include a Share button with an expandable banner.
    Keep it simple and functional.

    Highlight the prompt above and copy it to your clipboard to start your Sidekick build.

    Product Weight Manager

    What This App Does

    • Audit Your Catalog: Use the “0 weight” toggle to find missing data.
    • Focus on What’s Selling: Hide out-of-stock items instantly
    • Instant Updates: Save weights and units with one click.
    • Track Progress: See the “Last Updated” timestamp pulled directly from Shopify’s API

    This prompt uses the inventoryItemUpdate mutation to change your live store data.

    We always recommend testing one or two items first to ensure your units are selected correctly.

    Common Questions

    Why is product weight so important?

    It is the backbone of accurate carrier-calculated shipping. Missing weights mean you undercharge and eat the cost

    Does this handle packaging weight?

    This manages product weight. Set your “Default Package Weight” in Shopify Settings > Shipping and Delivery.

    What if I want more columns, like “Profit Margin”?

    These apps are iterative! Just ask Sidekick: “Now add a column showing Price and Cost Per Item.”

    Did you try this? Drop a comment below and let us know how many “0 weight” items you found lurking in your store!