Author: Bill J

  • God-Mode: The Product Quality Hunter

    God-Mode: The Product Quality Hunter

    Product Quality Checker

    PREREQUISITES:

    • Time To Build: 90 Seconds
    • Access Level: Shopify Sidekick + Admin API
    • Primary Impact: Conversion Rate (CRO) & SEO Ranking

    The “Invisible” Catalog Errors

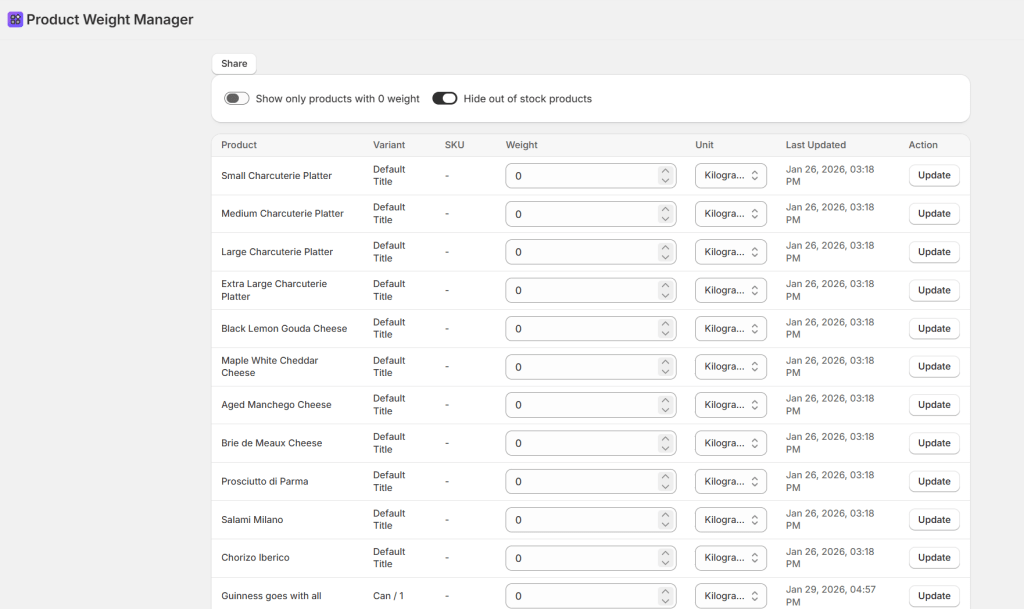
    As your catalog grows, “data decay” sets in. You have products live without images (a conversion killer), variants with zero weight (which breaks your shipping rates at checkout), and empty SEO fields that make you invisible to Google.

    Shopify’s native bulk editor is great for changing prices, but it’s terrible at finding what is missing. Manually auditing hundreds of products to find a single missing thumbnail is a waste of your talent.

    The Quality Command Center

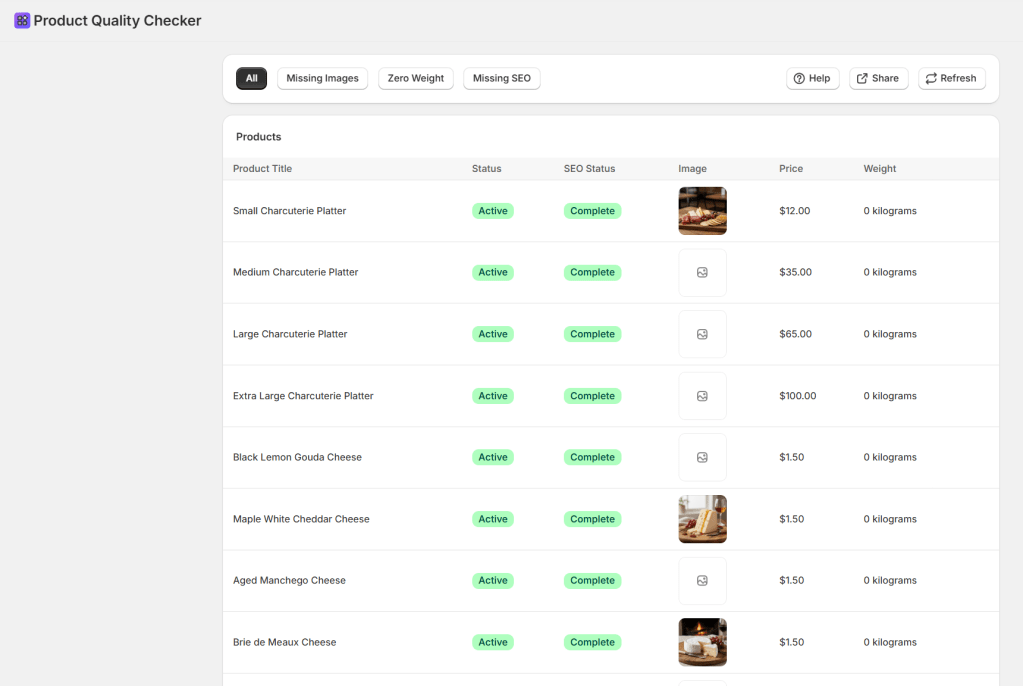
    This Blueprint builds a dedicated Product Quality Checker. It acts as a digital scanner for your store, instantly flagging products that are live but incomplete. Instead of clicking through every product page, you get a single-view table with “One-Click Filters” to hunt down missing assets and SEO gaps before they cost you a sale.

    The Exact Prompt

    Create a 'Product Quality Checker' app to identify catalog issues.
    Show products in a table with columns for: Title (link to editor),
    Status (Active/Draft badge), SEO Status (Complete/Missing badge),
    Image (thumbnail), Price, and Weight.
    Include 4 Quick-Filter buttons:
    1. 'All' (50 per page)
    2. 'Missing Images' (filters where image array is empty)
    3. 'Zero Weight' (scans variants for 0 weight)
    4. 'Missing SEO' (checks for empty description or SEO meta-description).
    Include a 'Refresh' button to reload data and pagination controls.
    Add a 'Help' button that opens a modal explaining how to
    improve weights, images, and SEO descriptions.

    Triple-click the box above to copy the magic.

    How to use your new Command Center

    • Missing Images: Instantly isolate products that lack a visual identity. Aim for 3-5 high-quality images per product to boost trust.
    • Zero Weight: Identify variants that will cause shipping calculation errors. Accurate weights are the backbone of your logistics.
    • SEO Status: View a Green (Complete) or Yellow (Missing) badge for every product. High-quality SEO requires unique descriptions of at least 150 words.
    • Direct Access: Click any Product Title to jump straight into the Shopify editor, fix the issue, and return to your dashboard.

    Pro-Tip: While this tool is an auditor, it relies on the write_products scope to allow future modifications. Always use the Refresh button after making bulk edits to see your “Error List” clear in real-time. Systematically review your catalog page-by-page to ensure 100% data integrity.

    Lab Discussion

    Why this matters?

    Conversion is built on trust. A product without an image or a checkout that crashes because of “Zero Weight” destroys that trust instantly. By building this tool, you’re not just organizing—you’re performing a professional-grade store audit in seconds, ensuring your store functions as well as it looks.

    Sidekick Challenge: What’s the biggest data gap you found? Let us know in the comments and we’ll help you customize your Hunter to scan for specific Metafield gaps!

  • Stop Manual Tagging: Build a Bulk Manager in 120 Seconds

    Stop Manual Tagging: Build a Bulk Manager in 120 Seconds

    Product Tag Manager

    PREREQUISITES:

    • Time: 120s
    • Access: Shopify Sidekick / Admin API
    • Impact: Catalog Architecture

    The Tagging Trap.

    Standard Shopify bulk editing is a nightmare for precision work. You can’t see collection memberships and tags in one view, and tagging individual variants (like specific materials or seasonal colors) usually requires a monthly app subscription or hours of manual clicking. When your catalog hits “scale,” manual organization becomes a full-time job you didn’t sign up for.

    The Sidekick Solution: “The Central Command”

    This prompt acts as your Administrative Equalizer. It builds a comprehensive dashboard inside your Admin using Preact and Polaris. It provides a “God-mode” view of your store, allowing for variant-level tagging, manual collection mapping, and high-speed sorting—all within a native-feeling, paginated interface that handles large catalogs with ease.

    The Recipe

    "Create an app that lets me add tags to existing products in my store.
    It should show products in a table with their current tags and collections.
    Products should be expandable to show variants, but only if they have multiple variants or custom variant titles (not just 'Default Title').
    Allow me to add new tags to both products and variants using comma-separated input.
    Include a dropdown to add products to existing manual collections.
    Add sorting options: Title A-Z, Title Z-A, Newest first, Oldest first.
    When variants are expanded, they should align with the product table columns. Include Help and Share buttons that open modals with usage instructions and app information.
    The Share modal should include the exact prompt to recreate the app."

    Triple-click to copy the prompt.

    What This App Does

    • Smart Variant Management: Automatically hides the “Expand” option for single-variant products to keep your workspace clean.
    • Flexible Sorting: Instant toggle between Alphabetical (A-Z/Z-A) and Chronological (Newest/Oldest) views.
    • Granular Control: Apply comma-separated tags to specific variants or parent products simultaneously.
    • Pro-Level Pagination: Seamlessly navigate large catalogs (25 products per page) without losing your sort settings.

    “This prompt utilizes tagsAdd and collectionAddProductsV2 to modify live database entries. This app only works with manual collections, not smart collections.”
    Test the ‘Expandable Row’ feature on a single test product before bulk execution.

    Common Questions

    Do I need to create tags in the Shopify Admin first?

    No. Tags are created automatically as you type them into the bulk input field—no pre-setup required.

    Does this support Smart Collections?

    No, this tool is specifically designed for Manual Collections. Automated collections are handled by Shopify’s internal logic.

    Sidekick Challenge:How many hours a week do you spend on catalog organization? Tell me in the comments and I’ll help you refine this prompt for your specific workflow!!

  • Kill the Pricing Headache: Build a Bulk Variant Price Updater in 60 Seconds

    Kill the Pricing Headache: Build a Bulk Variant Price Updater in 60 Seconds

    Product Variant Pricing Manager

    PREREQUISITES:

    • Time: 60s
    • Access: Sidekick AI
    • Plan: Grow / Advanced / Plus

    The “Click-and-Wait” Fatigue

    Shopify’s native bulk editor is powerful, but it’s a chore when you need to change prices for a single product with 50+ variants. Whether you’re prepping for a flash sale or adjusting for inflation, you shouldn’t have to hunt through columns or wait for massive tables to load just to change a “Large / Red” variant from $20 to $25.

    The Solution: Sidekick It

    We are sharing a recipe for a Variant Price Updater. This app gives you a focused “Command Center.” You search for a product, see every variant on one screen, and update prices in bulk with a single click. No spreadsheets, no hunting for columns—just fast, secure pricing updates.

    The Exact Prompt

    Create a brand new Variant Price Updater app.
    The app should:
    - Provide BOTH a dropdown menu (loading up to 250 products alphabetically)
    AND a search field for product selection.
    - Display all variants for the selected product in a paginated table
    (100 variants per page).
    - Show columns for: Checkbox (for selection), Variant name (showing option
    values like "Small / Red"), Current Price, New Price input field.
    Logic:
    - Allow users to select multiple variants and enter new prices.
    - Include an "Update Prices" button that uses the productVariantsBulkUpdate
    mutation to update selected variants.
    - Show success/error messages and refresh the table after updates.
    - Include separate Help and Share buttons.
    Keep it simple and functional.

    Triple-click the box above to copy the magic.

    Key Features of Your New Price Updater

    • Dual Selection Mode: Use the search bar for speed or the dropdown to browse alphabetically.
    • Bulk Checkboxes: Only want to change the price of the “Extra Large” sizes? Check the boxes you need and leave the rest untouched.
    • Paginated for Performance: Even if you have hundreds of variants, the app handles them in 100-per-page chunks to keep things fast.
    • Real-Time Refresh: As soon as you hit “Update,” the app confirms the change and refreshes the table so you can see your live prices immediately.

    ⚠️ Warning: This app uses the productVariantsBulkUpdate mutation to push changes directly to your live store. Always double-check your “New Price” inputs before clicking Update—especially if you are adjusting high-ticket items!

    Common Questions

    Can I undo a bulk price change?

    There is no “Undo” button; you would simply run the prompt again with the previous prices. We recommend exporting a CSV of your products before any massive pricing overhauls.

    Does this update the “Compare-at Price”?

    This specific recipe focuses on the Current Price. If you want to handle sales, ask Sidekick: “Add a ‘Compare-at Price’ column to this table and include it in the update mutation.”

    Will new prices show up on my store immediately?

    Yes! Once the mutation is successful, Shopify’s cache usually updates within seconds for your customers.

    The Sidekick Challenge: What’s the biggest “pricing oops” you’ve ever had on your store? Let us know in the comments if this command center helps you sleep better at night!

  • Untangle Your Shipping: Build a Product Shipping Options Reviewer in Sidekick

    Untangle Your Shipping: Build a Product Shipping Options Reviewer in Sidekick

    Product Shipping Options Reviewer

    PREREQUISITES:

    • 90s (Two-step prompt)
    • Access: Sidekick AI
    • Plan: Grow / Advanced / Plus

    The Shipping Profile Maze

    If you’ve ever spent hours wondering why a customer can’t see the “Expedited Shipping” option for a specific product, you know the headache. Shopify’s default interface makes it difficult to see which Delivery Profiles are assigned to which products at a glance. As you add special handling profiles (hazmat, oversized, dropshipped), it becomes a tangled mess of missing profiles and redundant rules.

    The Solution: Sidekick It

    This Sidekick-powered Product Shipping Options Manager cuts through the complexity. Instead of clicking through dozens of product pages, you can build a custom app that visualizes all your products and their assigned shipping profiles. This is your command center for pinpointing exactly why a shipping option isn’t showing up at checkout.

    The Exact Prompt

    Note: This recipe works best in two stages. Follow the order below:

    Step 1: The Foundation

    I want to create an app that checks various shipping options across all of my products
    and allows me to see very quickly what products have what shipping options available.

    Step 2: The Refinement (Paste after Sidekick responds to Step 1)n

    Request these enhancements:
    - View delivery profile details in a modal.
    - Add Help button and Share button.
    - Add expandable rows for variants.
    - Suppress expandable rows for products with only default variants.
    - Add shipping methods and conditions to the delivery profile details.

    Triple-click the boxes above to copy the magic.

    Key Features of Your New Shipping Sidekick App

    • Comprehensive Product View: See all physical products in one scrollable, paginated table.
    • Delivery Profile Assignments: Instantly identify which profile (e.g., “Heavy Goods,” “Dropship Partner”) each item belongs to.
    • Variant-Level Detail: Expand products to see if specific variants (like your “Oversized” version) have the correct shipping rules.
    • Detailed Profile Modal: Click any profile name to see Shipping Zones, Countries, and specific Methods (Standard, Express, etc.) along with their price/weight conditions.
    • Shareable Instructions: Use the built-in “Share” button to send the logic to your logistics team.

    ⚠️ Note: This specific app is designed for visualization and auditing. It pulls data from the Delivery Profile API. While it provides incredible clarity, always perform a final test at your storefront checkout after making significant changes to your Shipping and Delivery settings.

    Common Questions

    What is a “Delivery Profile”?

    It is a set of shipping rules for specific products and locations. Shopify uses these to determine which rates to show at checkout based on what’s in the cart.

    Can this app change the assignments?

    This specific recipe is a “Manager View” for auditing. To move products, you can follow up with Sidekick and ask: “Now, add a feature to move selected products to the [Profile Name] profile.”

    Is this useful for small stores?

    Even with a “General” profile, this app is a game-changer for troubleshooting why a specific country or weight bracket isn’t triggering the correct shipping rate.

    The Sidekick Challenge: Have you ever had a “Shipping Fail” where a customer was charged $0 for a heavy item? Drop a comment below and tell us how this audit tool changed your workflow!

  • Master Dimensional Weight: Build a Shopify Product Dimensions Manager in Seconds

    Master Dimensional Weight: Build a Shopify Product Dimensions Manager in Seconds

    Product Dimensions Manager

    PREREQUISITES:

    • Time: 60s
    • Access: Shopify Sidekick AI
    • Plan: Grow / Advanced / Plus

    The “Dim Weight” Trap

    Have you ever been shocked by a shipping invoice that was double what you quoted a customer? Welcome to the world of Dimensional Weight. Carriers like Canada Post, UPS, and FedEx don’t just care how much a box weighs; they care how much space it takes up. If you ship a 1lb pillow in a large box, you’ll be charged for the space, not the weight. If you aren’t tracking Length, Width, and Height, you’re flying blind.

    The Solution: Sidekick It

    Today, we’re using Shopify Sidekick to build a custom Product Dimensions Manager. This app creates a central dashboard to audit your entire catalog and save dimensions as Metafields—without needing a third-party paid app. By tracking these in Shopify, you can provide accurate data to 3PLs and use advanced apps to calculate exact box fits.

    The Exact Prompt

    Create a brand new Product Dimensions Manager app.
    The app should:
    - Display physical products that require shipping in a table.
    - Show columns for: Product name, Variant, SKU, Length, Width, Height,
    Dimension Unit selector (Inches, Centimeters, Meters, Feet),
    Last Updated, and an Update button.
    Include filter toggles:
    1. "Show only products with missing dimensions"
    2. "Hide out of stock products"
    Logic:
    - Allow users to enter L, W, and H values and select units.
    - Store dimensions as custom metafields using the productVariantsBulkUpdate mutation.
    - Show a "Last Updated" column for tracking modifications.
    - Include a Share button with instructions in an expandable section.
    Keep it simple and functional.

    Triple-click the box above to copy the magic.

    Key Features of Your New App

    • Metafield Integration: Automatically creates and updates Metafields in the sidekick namespace (length, width, height).
    • Smart Filtering: Instantly isolate products that are missing data or hide out-of-stock items.
    • Bulk-Ready Table: Update your L x W x H and Unit (Inches/CM) on one screen.
    • Data Validation: Prevents “fat-finger” typos by ensuring only numbers are entered for dimensions.

    ⚠️ Technical Note: The data saved by this app is stored as Variant Metafields (Key: sidekick.length, sidekick.width, etc.). Ensure your shipping or 3PL software is configured to read these specific metafield keys for automated calculations..”

    Common Questions

    Why store dimensions as Metafields?.

    Shopify’s core product fields don’t include L x W x H by default. Metafields are the standard way to store this extra data so other apps and carriers can access it

    Sidekick Challenge” question to encourage comments.

    Can I change the units later?

    Yes! The app includes a unit selector (Inches, CM, etc.). If you switch units, the app will update the sidekick.dimension_unit metafield accordingly.

    Is there a limit to how many products I can update?

    The productVariantsBulkUpdate mutation is very efficient, but if you have thousands of variants, Sidekick may process them in batches.

    The Sidekick Challenge: Check your last UPS or FedEx bill. How much did “Dimensional Weight” cost you this month? Let us know in the comments if this tool helped you bridge the gap!

  • Stop Guessing Shipping Costs: Build Your Own Product Weight Manager in 60 Seconds

    Stop Guessing Shipping Costs: Build Your Own Product Weight Manager in 60 Seconds

    Product Weight Manager

    PREREQUISITES:

    • Time: 60s
    • Shopify Sidekick | Plan: Grow/Advanced/Plus
    • Impact: High

    The “Zero Weight” Silent Killer.

    One of the quickest ways to lose money on Shopify isn’t high ad spend—it’s inaccurate shipping weights. Clicking into every single product variant in the Shopify Admin to check a weight field is soul-crushing work. This leads to inaccurate “Free Shipping” triggers and major discrepancies at the post office..

    The Solution: Sidekick It

    We are “Sidekicking” this task today. This isn’t just a list; it’s a command center. You’ll generate an app that lets you filter for those “0 weight” culprits and update them in a single table—no more opening 50 different tabs.

    The Exact Prompt

    Create a brand new Product Weight Manager app.
    The app should:
    - Display physical products that require shipping in a table.
    - Show columns for: Product name, Variant, SKU, Weight input field,
    Unit selector (Grams, Kilograms, Ounces, Pounds),
    Last Updated, and an Update button.
    Include two filter toggles:
    1. "Show only products with 0 weight"
    2. "Hide out of stock products"
    Logic:
    - Allow users to update weights using the inventoryItemUpdate mutation.
    - Query inventoryItem.updatedAt for the timestamp.
    - Include a Share button with an expandable banner.
    Keep it simple and functional.

    Triple-click the box above to copy the magic.

    What This App Does

    • Audit Your Catalog: Use the “0 weight” toggle to find missing data.
    • Focus on What’s Selling: Hide out-of-stock items instantly
    • Instant Updates: Save weights and units with one click.
    • Track Progress: See the “Last Updated” timestamp pulled directly from Shopify’s API

    This prompt uses the inventoryItemUpdate mutation to change your live store data.

    We always recommend testing one or two items first to ensure your units are selected correctly.

    Common Questions

    Why is product weight so important?

    It is the backbone of accurate carrier-calculated shipping. Missing weights mean you undercharge and eat the cost

    Does this handle packaging weight?

    This manages product weight. Set your “Default Package Weight” in Shopify Settings > Shipping and Delivery.

    What if I want more columns, like “Profit Margin”?

    These apps are iterative! Just ask Sidekick: “Now add a column showing Price and Cost Per Item.”

    Did you try this? Drop a comment below and let us know how many “0 weight” items you found lurking in your store!

  • Shopify Flow Heartbeat Monitoring: The Complete Setup Guide

    Shopify Flow Heartbeat Monitoring: The Complete Setup Guide

    Flow Heartbeat Monitor Dashboard

    Shopify Flow is the central nervous system of your store. It handles inventory alerts, customer tagging, and fraud detection. But there’s one major problem: How do you know if a Flow stopped running? Usually, you only find out when a task fails—which is often too late.

    Today, we are “Sidekicking” your automation infrastructure. We’re building a Flow Heartbeat Monitor. This custom Sidekick app gives you a live dashboard of every Flow in your store, showing you exactly when they last “pulsed” and their current status.

    • Before You Start:
    • Ensure you have Shopify Sidekick enabled in your admin.
    • You must have the Shopify Flow app installed.
    • You should have “Manage Settings” permissions to edit Shop Metafields.

    Step 1: Create the Monitoring App

    First, we need to build the dashboard where you’ll view your Flows. Open Sidekick in your Shopify Admin, click the “+” button, select “Generate app,” and paste the prompt below.

    Create a Flow Heartbeat Monitor app that:
    - Queries shop metafields with namespace 'flow_heartbeat'
    - Parses JSON values containing flowName, lastRun (ISO date), and status (active/warning/error)
    - Displays a table with columns: Flow Name, Status (color-coded badge), Last Run, Time Since Last Run, Actions
    - Sorts by most recent run first
    - Includes 'Create New Flow' button linking to shopify://admin/apps/flow
    - Includes 'Open Flows' buttons in each row linking to shopify://admin/apps/flow
    - Includes 'Copy Instructions' and 'View Full Guide' buttons with complete setup documentation
    - Shows empty state when no flows are configured

    Step 2: Configure Your Flows

    • Action: Update shop metafield
    • Namespace: flow_heartbeat
    • Key: unique_flow_name (e.g., inventory_check)
    • Type: json

    Each Flow needs a unique “Key.” If you use the same key for two different Flows, they will overwrite each other in the dashboard. Use lowercase and underscores only.

    Paste this into the Value field of your Flow action. Customize the flowName to match your Flow.

    {"flowName": "Order Confirmation Email", "lastRun": "{{ "now" | date: "%Y-%m-%dT%H:%M:%SZ" }}", "status": "active"}

    Troubleshooting & Technical Details

    IssueLikely CauseFix
    App is EmptyNo Flows have run yet.Manually trigger a Flow to “Check In.”
    Invalid DateLiquid syntax error.Ensure the date: filter has double quotes around the format string.
    Missing FlowsWrong Namespace.Verify the namespace is exactly flow_heartbeat.
    JSON ErrorSmart/Curly Quotes.Ensure you are using “Straight Quotes” " and not “Curly Quotes” .

    💡 Pro-Tip: Don’t just put the heartbeat at the successful end of a Flow. If you have a complex Flow with multiple branches, add a heartbeat with "status": "error" inside your error-handling branches to see failures instantly on your dashboard!

    Not at all. The “Update shop metafield” action is a native Shopify function that takes milliseconds to execute. It happens at the very end of your workflow, so it won’t interfere with your actual business logic.

    Since the “Heartbeat” is stored as a shop metafield, it will stay in your dashboard until you manually delete that metafield. You can do this in Settings > Custom Data > Shop Metafields.

    This usually happens if the Liquid code in your Flow wasn’t copied exactly. Double-check that your value field contains {{ "now" | date: "%Y-%m-%dT%H:%M:%SZ" }}. This specific format is required for the dashboard to calculate the time difference.

    Yes, but you’ll need to generate the Sidekick app in each store. Because the data is stored in “Shop Metafields,” the heartbeat data is private to each specific store.

    🏷️ The Metafield Key Naming Guide

    A “Key” is the unique ID for each Flow. If two Flows share a key, the dashboard will only show whichever one ran most recently. Follow these “Golden Rules” to keep your data clean.

    The “Snake_Case” Standard

    Always use lowercase letters, numbers, and underscores. Avoid spaces, hyphens, or emojis in the “Key” field.

    • Good: order_fraud_check
    • Bad: Order Fraud Check! or order-fraud-check

    The Naming Formula

    Use the [Category] _ [Action] _ [Market/Segment] formula:

    CategoryKey ExampleBest For
    Ordersorder_tagging_high_valueFraud, VIP tagging, or fulfillment alerts.
    Inventoryinv_threshold_alert_shoesLow stock or backorder notifications.
    Customerscust_welcome_series_newMarketing automation or tag-based triggers.
    Clean-upsystem_archive_old_ordersBehind-the-scenes data maintenance.

    💡 Quick Distinction:

    • The Key: Is for the computer (e.g., vip_alert). It must be unique.
    • The flowName (in JSON): Is for you (e.g., VIP Customer SMS Alert). This can be as pretty and descriptive as you like!

    Setting up a Heartbeat Monitor is the difference between reacting to a broken store and proactively managing your business. Once you’ve set up your first three critical Flows, you’ll wonder how you ever managed your automation without it.