Stop manual publishing. Automatically push products live the exact moment a photo is added.
Author’s Note: I was scrolling through the Shopify subreddit recently and saw a merchant venting about a frustrating, yet incredibly common, problem. Their inventory app was syncing new products to their store perfectly, but the product images were coming in on a delay. The result? Half-empty “skeleton” listings were going live for customers to see. To prevent it, the merchant was stuck manually hitting “Publish” on hundreds of products every single day.
It felt like the perfect challenge. Instead of writing custom code, I opened up Shopify Sidekick to see if we could architect a 24/7 background automation to fix it. Here is how we turned that Reddit pain point into a live solution in about 20 minutes.
The Problem
If you sync your inventory from an external ERP, drop-shipper, or CSV, those products often hit your Shopify admin as “skeletons”—just text and pricing, with no images. You definitely don’t want empty listings showing up on your storefront.
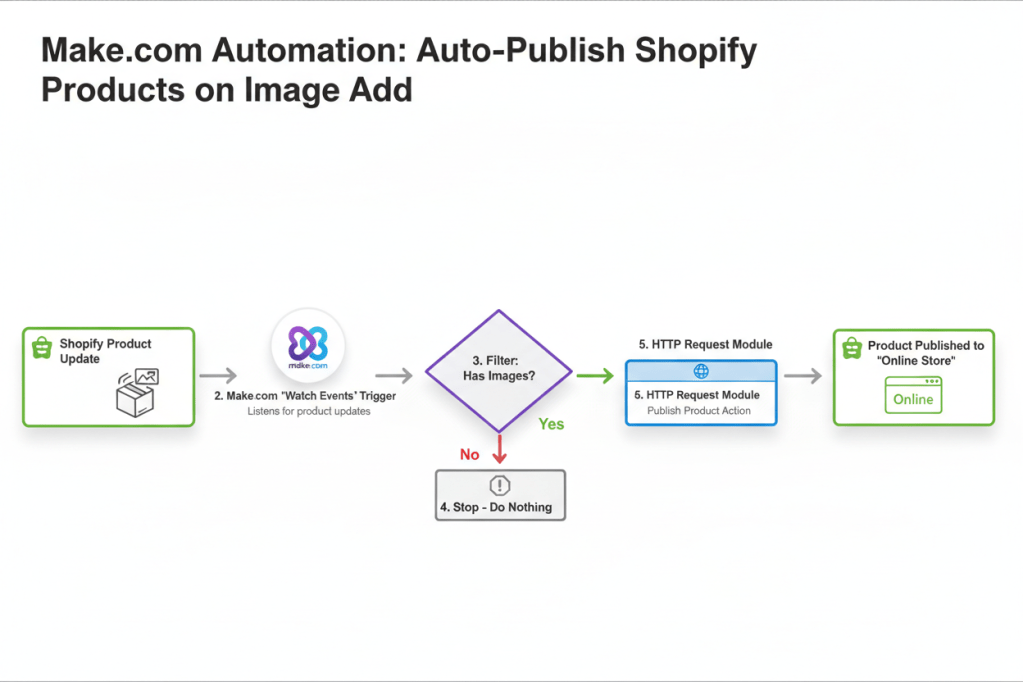
The goal of this recipe is to build an automation that watches your store 24/7 and automatically “flips the switch” to publish a product only when it detects an image file has been attached.
The Architect: Shopify Sidekick
You don’t need to be a developer to build this, but you do need an architect. We are using Shopify Sidekick to fetch store-specific technical IDs, write our JSON payloads, and troubleshoot any errors we hit along the way.
Phase 1: The Sidekick “Pre-Flight” Prompts
Before we open Make.com, we need to gather your store’s unique technical data. Open Sidekick in your Shopify Admin and copy/paste these two prompts:
Prompt 1: Get Your JSON Blueprint
“I am building a Make.com automation to publish products to the Online Store. I need to send a PUT request to the Shopify Admin API. Please provide the exact JSON body required to set the published_scope to ‘web’ and the published_at to the current timestamp.”
Prompt 2: Get your Publication ID (Just in case)
“As a backup for my automation, please provide my Online Store Publication ID in the format gid://shopify/Publication/123456789.”
(Save both of Sidekick’s answers in a notepad—you’ll need them in Phase 3!)
Phase 2: Create the Shopify “Bridge” (Custom App)
Standard third-party connections often lack the deep “write” permissions needed to change a product’s publication status. You must create a Custom App to give Make.com the right access
- In your Shopify Admin, go to Settings > Apps and sales channels > Develop apps.
- Click Create an App and name it “Sidekick Auto-Publish.”
- Click Configure Admin API scopes. Search for and check these four boxes:
read_products,write_products,read_publications, andwrite_publications. - Click Install App.
- Click “Reveal token once.” ⚠️ STOP AND COPY THIS TOKEN NOW. Store it somewhere safe. Once you close this window, Shopify will never show it to you again.
Phase 3: Building the Make.com Blueprint
Log into Make.com (the free tier is perfect for this) and create a new Scenario.
NOTE: If at any time you need clarification, just tell Sidekick where you are in the process, and where you are stuck.
Important Make.com Quirk: You cannot create a logic filter between modules until both modules exist on the canvas. So, we will build the Trigger, then the Action, and then connect them with our Filter.
Step 1: The Trigger (Watch for Updates)
- Module: Shopify -> Watch Events.
- Webhook: Click Add to create a new webhook named “Image Check.”
- Connection: Choose Add, then select Custom Connection. Paste the API Token you saved from Phase 2.
- Topic: Type and select
products/update. (This tells Make to wake up every time a product is altered).
Step 2: The Action (The Publisher)
- Module: HTTP -> Make a request. (Place this right next to your Shopify module).
- URL:
https://your-store-name.myshopify.com/admin/api/2024-01/products/{{1.id}}.json(Note: Replace your-store-name with your actual store prefix. Replace {{1.id}} by clicking into the field and mapping the Product ID from your Shopify module). - Method:
PUT - Headers: Click “Add item” twice to add two headers. Header 1 Name:
X-Shopify-Access-Token| Value: (Paste your API Token from Phase 2). Header 2 Name:Content-Type| Value:application/json. - Body Type: Raw
- Content Type: JSON (application/json)
- Request Content: Paste the JSON code Sidekick gave you in Phase 1. It should look exactly like this:
{ "product": { "id": {{1.id}}, "published_scope": "web", "published_at": "{{now}}" }}
Step 3: The Logic Gate (The Filter)
- Now that you have two modules connected, click the dotted line between them to “Set up a filter.”
- Label: “Is Image Present & Is Hidden?”
- Condition 1:
Images[]: URL| Exists (This ensures an actual image file is attached). - Condition 2:
Published At| Does not exist (Crucial: This prevents an “infinite loop” where the automation keeps trying to publish a product that is already live).
Phase 4: Testing & Activation
- Prep: Go to Shopify. Create a test product with no image and leave it as Draft/Unpublished.
- Test: In Make.com, click the “Run Once” button at the bottom left. It will start spinning.
- Trigger: Go back to your Shopify test product, upload an image, and hit Save.
- Verify: Watch Make.com. You should see a green checkmark pass through the filter and hit the HTTP module. Go back to Shopify—your product should now be “Active” and published to your Online Store!
- Go Live: Toggle the Make.com scenario to ON and let it run in the background.
FAQ & Troubleshooting: Let Sidekick Fix It
When building automations, errors aren’t a sign of failure—they are just part of the process. If your Make.com scenario throws a red error bubble, don’t panic. Copy the error, and let Shopify Sidekick act as your senior developer. Here are the most common issues and exactly how to use Sidekick to solve them:
The HTTP module throws a “401 Unauthorized” error.
The Problem: Shopify is blocking the request. This usually means your API token is incorrect, expired, or your Custom App is missing the right permissions.
Ask Sidekick: “I am sending a PUT request to update a product in Make.com, but I am getting a 401 Unauthorized error. Can you list the exact Admin API scopes my Custom App needs to have enabled to allow write_publications and write_products?”
The HTTP module throws a “422 Unprocessable Entity” error.
The Problem: Your API token works, but Shopify doesn’t understand the data you are sending. This is almost always a typo or formatting error in your JSON body (like a missing comma or quotation mark).
Ask Sidekick: “I am getting a 422 error in Make.com when trying to publish a product. Here is the JSON I am putting in the Request Content field: [Paste your exact JSON]. Can you rewrite this to fix any formatting errors?”
Make.com says “Module references non-existing module ‘1’”
The Problem: Make.com assigns numbers to modules based on the order you create them. If you deleted a module and added a new one, your Shopify trigger might be module 2 instead of module 1.
The Fix: Delete {{1.id}} from your URL or JSON body, type {{, and select the correct numeric Product ID from the dropdown list.
Products without images are still getting published!
The Problem: Your Make.com filter is too broad. If you just check if “Image” exists, it might trigger on empty data brackets. You need to verify the image source URL actually exists.
Ask Sidekick: “My Make.com webhook is triggering even when an image isn’t present. What exact field from the Shopify products/update webhook payload should I filter by to guarantee an image file is actually attached?”
The REST API isn’t working for my specific store setup.d!
The Problem: Sometimes, depending on your store’s complex sales channels, the standard HTTP REST method won’t push the product to the Online Store. You need to use Make.com’s “Make a GraphQL API call” module instead.
Ask Sidekick: “The HTTP PUT method isn’t publishing my product to the Online Store correctly. I want to use Make.com’s ‘Make a GraphQL API call’ module instead. Can you write the exact GraphQL mutation and variables I need to publish a product, using my Online Store Publication ID?” (This is why we got that ID in Phase 1!).
Time to Start Building!
Building custom automations doesn’t have to be intimidating. With Sidekick acting as your co-pilot, you can easily bridge the gap between “I wish my store could do this” and actually making it happen. This image-first auto-publisher is just one example of how a few strategic prompts can save you hours of manual clicking every single week.
So, what manual task are you going to hand over to the robots next? If you have a workflow headache you’re trying to solve, drop a comment below or reach out. Let’s see if we can build the next recipe together.

Leave a comment